3D Measurement Systems for Uncooperative Freeforms – Thermal 3D Sensing

Scan the Impossible without Surface Preparation  


With 3D sensing in thermal infrared, it is possible to carry out 3D shape recording of objects made of transparent plastic or glass, with reflective or jet black surfaces or even the combination of different materials.


The direct 3D measurement and 3D recording of transparent and translucent objects as well as black and shiny objects is a major challenge for industrial image processing. Surface shape measurement is of great interest, for example, in the quality control of transparent objects made of glass or plastics or in the digitization of valuable works of art and cultural assets. In order to meet the growing demands for unrestricted automation, the position detection of objects with non-cooperative surfaces has been the focus of machine vision development for years. Our team, with more than 30 years of experience in optical metrology, has provided a metrological solution to this challenge that does not require any object preparation with its pioneering development of thermal 3D sensing.

Our services


We have incorporated our metrological solution into the world's first measurement system for the three-dimensional measurement of transparent objects, the goQUALITY3D. The measurement system is characterized by a variably adjustable measurement field and measurement parameters. Measurements can be carried out directly on customer objects or a sensor specially tailored to a measurement task can be developed together with the customer. Here, it is irrelevant for the measurement principle of thermal 3D sensing whether the measurement task is, e.g., in the field of industry, medical technology, or art and culture.

  • System development for application-specific 3D measurement systems for non-cooperative objects in several phases:
    • Measurability study
    • Development of a customer-specific 3D measurement system
    • Integration into existing production plant
  • Implementation of 3D measurement tasks
  • Partner in joint research and development projects in the field of 3D metrology

What characterizes our metrological solutions and where are the areas of application?

goQUALITY3D – the world's first measurement system for the three-dimensional measurement of transparent objects.  

At the Fraunhofer Institute for Applied Optics and Precision Engineering IOF, a demonstrator for the all-round measurement of non-cooperative objects has been realized, which is characterized by a high degree of flexibility with regard to the choice of measurement object and complete automation. The system, called goQUALITY3D, is the world's first measurement system with which reflective or transparent objects can be measured all-round using pattern projection in just a few seconds and with measurement uncertainties of less than 100 μm. In 2021, the 3D infrared sensor received the “inVision Top Innovation Award” for its innovative power.

The measurement method offers an extremely broad range of applications for a wide variety of use scenarios. Initial precise 3D measurements have already been carried out on transparent objects for automotive suppliers, customers from the glass industry or medical technology as well as from the art and culture sector.


Subsequent development of goROBOT3D teaches robots to see

Furthermore, the subsequent development of the technology is the goROBOT3D system: Our team at Fraunhofer IOF has succeeded in coupling the new sensor technology with a robotics application. In doing so, robots and machines in automated manufacturing processes are able to record and further process the surface of non-cooperative objects in three dimensions in a matter of seconds for the first time. Information can be derived from the position of the objects, enabling industrial robots to grip non-cooperative objects automatically and safely for the first time.


How does a thermal 3D measurement work?

The basic requirement for successful 3D measurement via active pattern projection and stereo observation is non-directional backscattering of the irradiated pattern from the object surface. In the case of non-cooperative objects with high transparency, reflectivity or high-volume scattering, this basic requirement is not fulfilled and therefore no classic 3D measurement is possible. The problem-solving approach of 3D sensing with thermal pattern projection is based on the following two principles:

  1. Many non-cooperative materials exhibit high absorption at the surface in the thermal infrared (IR). This makes it possible to imprint a thermal pattern on the surface through absorption.
  2. According to Planck's radiation law, this thermal pattern is emitted by the object regardless of direction and can be recorded using two thermal imaging cameras in a stereo arrangement.

The underlying idea is therefore absorption instead of diffuse reflection of the IR projection patterns and thermal imaging of the resulting radiance distribution on the surface of the measurement object.

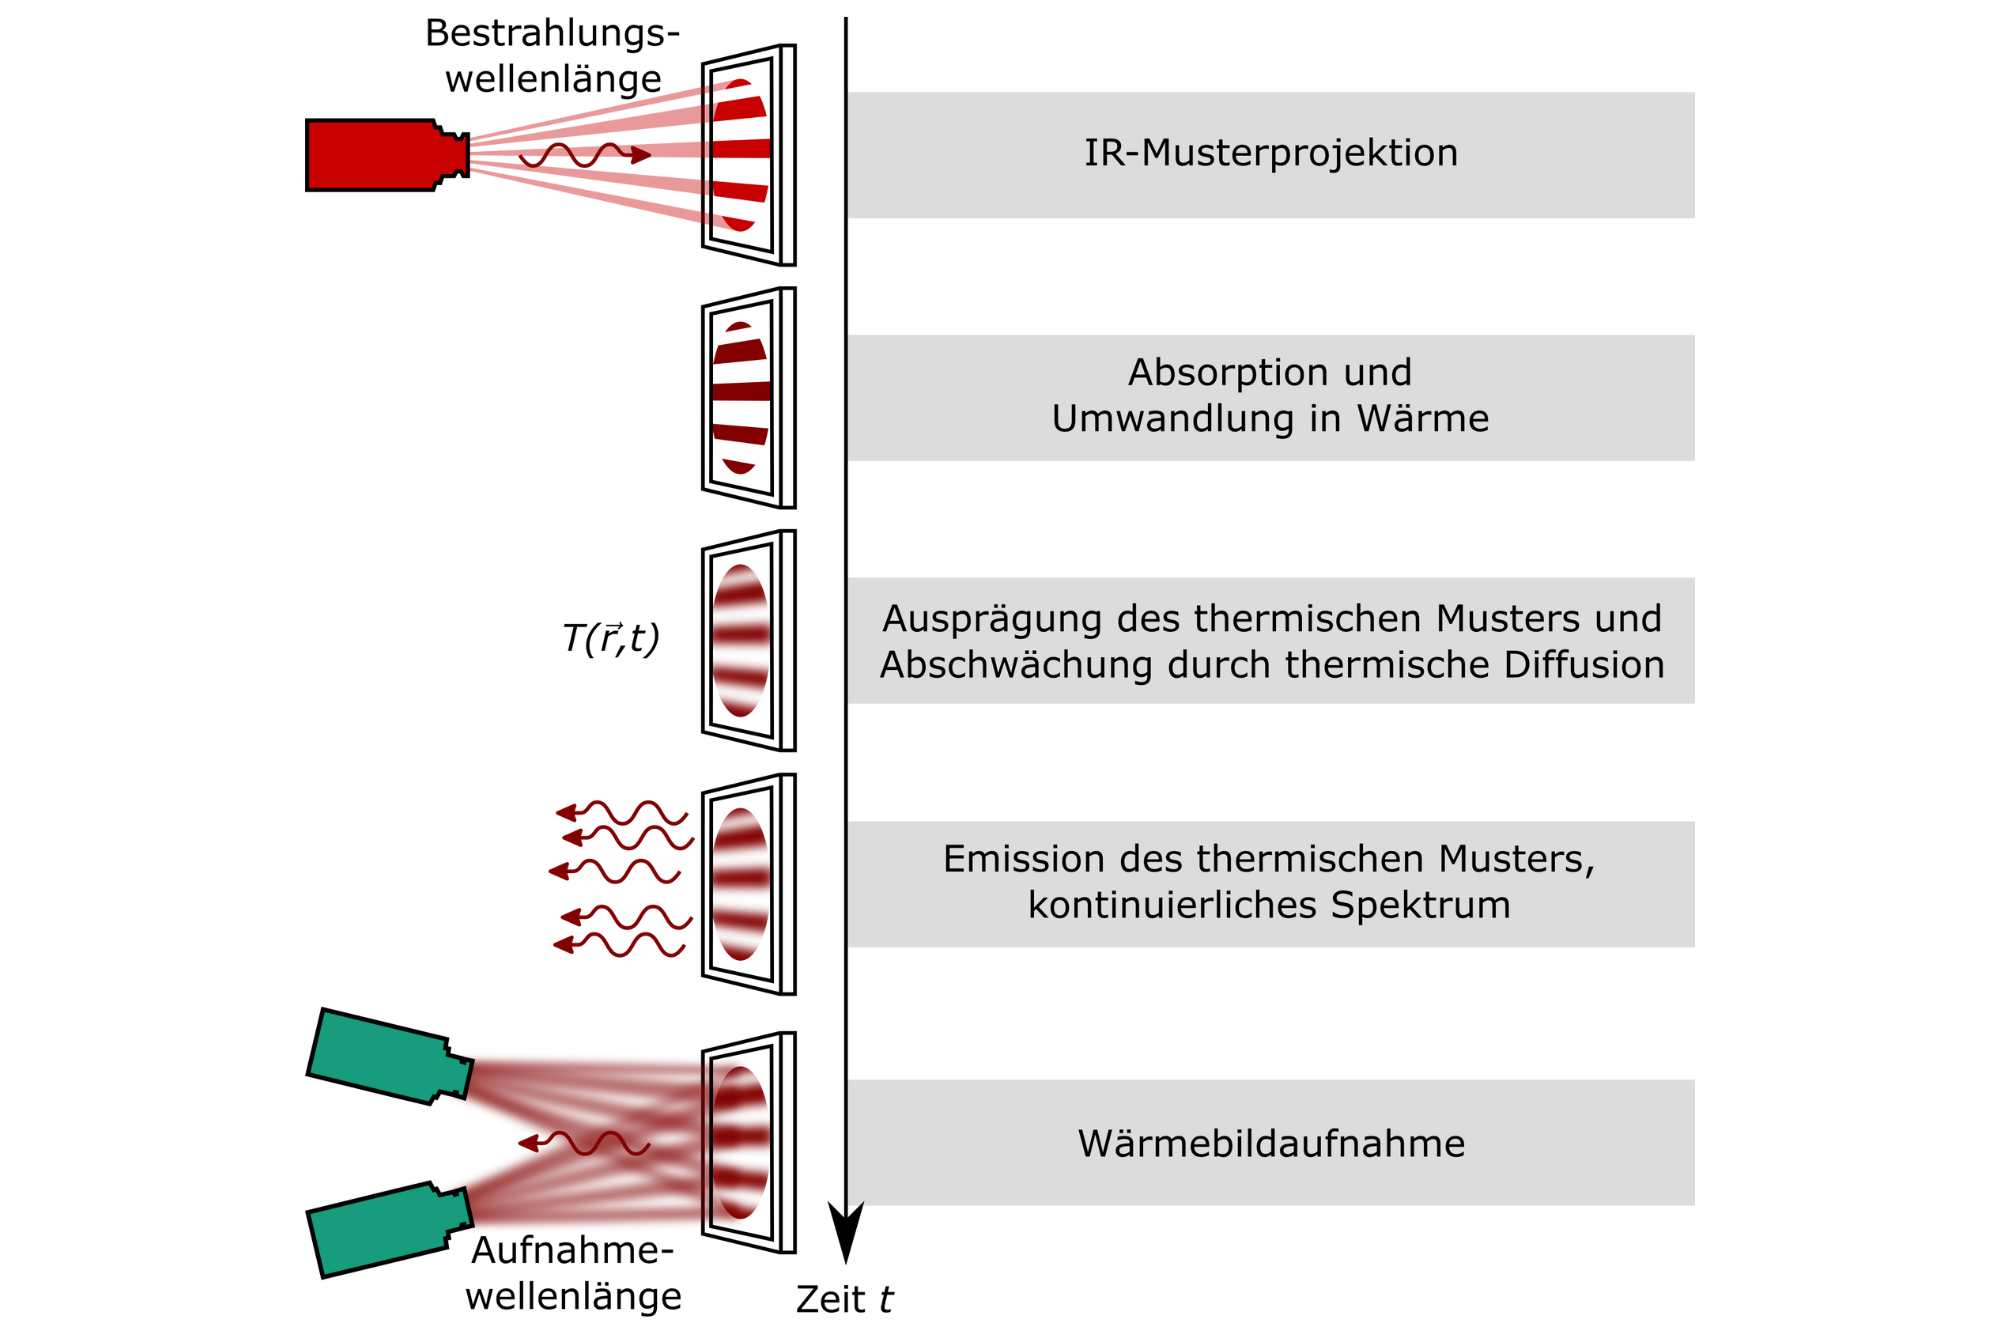
Functional principle of thermal 3D shape recording
© Fraunhofer IOF
Functional principle of thermal 3D shape recording

In the first step, the object surface is heated by a few Kelvins in a structured manner using a laser and a modulator. Thermal diffusion within the measurement object counteracts the heating and thus limits the temperature contrast of the heat pattern. It also changes the introduced heat distribution. According to the resulting thermal pattern on the object surface, thermal radiation is emitted regardless of direction. In the second step, this radiance or temperature distribution of the object surface is recorded with thermal imaging cameras in a stereo arrangement. Unlike in VIS and NIR, with this method projection and recording are decoupled both in terms of time and wavelength range.

This described sequence of a cycle is repeated N times so that two thermal image stacks of length N are obtained. Using a temporal correlation method, corresponding pixels (pixels in both cameras that image the same object point) are determined. Taking into account the extrinsic and intrinsic camera parameters, a 3D point cloud of the measurement object is then reconstructed using triangulation.


Downloads for product sheets on our research topics


Our data sheets summarise relevant information on our current research highlights in a compact and clear format. Use the download function to save interesting and relevant topics for later and to save important data and visualisations for later retrieval.

Do you have questions about our services?  

In a personal meeting, we will advise you on our (individual) range of services and our core competencies. Please contact us. 

Are you interested in a cooperation? Contact us!

We develop special and visionary solutions - tailored to the needs and wishes of our customers. Let us talk about your idea(s).


You would like to work with us?
Then apply with us!

We are always looking for creative minds and committed people who want to develop innovative solutions with light together with us. Visit our job portal or send us a speculative application: